📖 Overview
The GnollHack wiki can't be edited directly on the web. Instead, you need to update the GnollHackWiki git repository on GitHub. Wiki pages are text files in the Markdown format, which has been extended with a Gollum-style wiki tag syntax, particularly wikilinks, which link pages to each other.
Once the repository has been updated, the changes will sync to the web once every 5 minutes. There's no separate build step involved.
💡 Tip: If you don't have rights to update the GnollHackWiki GitHub repository, you need to fork the repository on GitHub and make a pull request. However, it is usually easier just to ask someone with editing rights to update the repository instead.
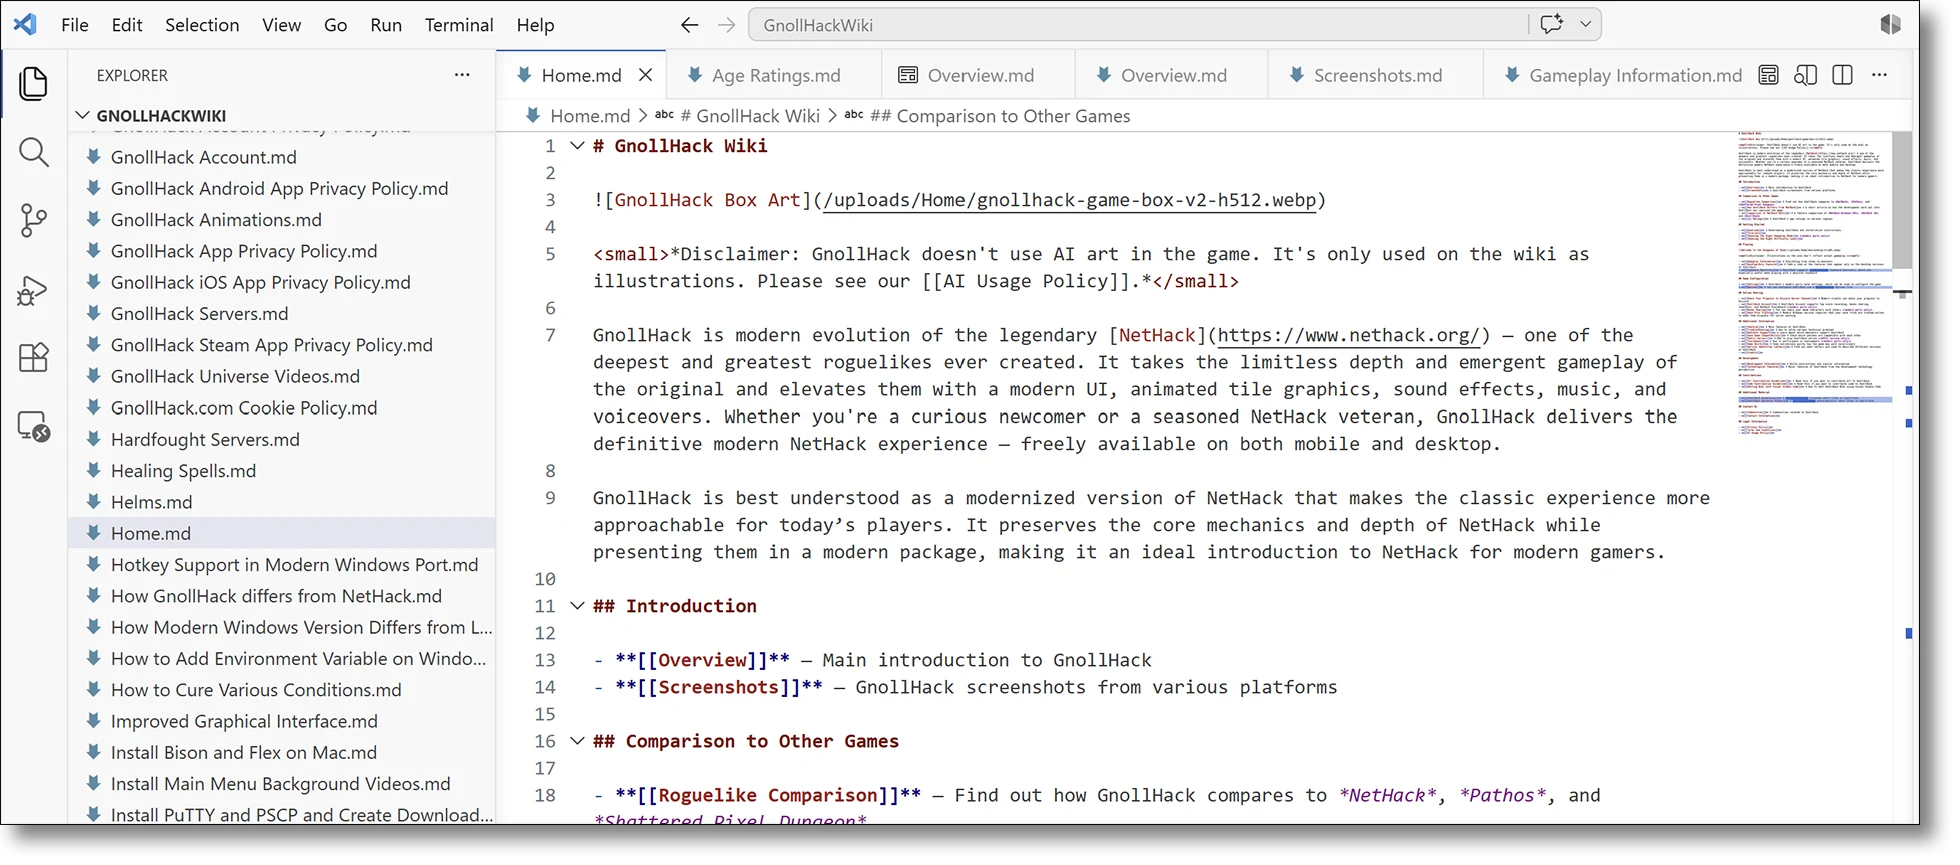
To get an optimal wiki editing experience, you need to install Visual Studio Code or Antigravity IDE and some of their extensions. These will help you update wiki pages and upload images with great efficiency.
🏷️ Gollum-Style Wiki Tag Syntax
Gollum is the wiki software used by the GnollHack wiki. It has its own proprietary wiki tag syntax, which differs from that used by MediaWiki (which is used by, e.g. Wikipedia). Please see the Foam for Gollum Visual Studio Code extension's description for the most important details. The Gollum wiki also has a technical description of the supported tags.
💻 Editing Software
You have two options for the wiki editing software, along with a couple of recommended extensions:
| Software / Extension | Category | Description |
|---|---|---|
| Visual Studio Code | IDE | Microsoft's lightweight but powerful code editor (Recommended). |
| Antigravity IDE | IDE | Google's AI-agent-first IDE. |
| Foam for Gollum | Extension | Provides Gollum-style wikilink support, auto-completion, and automatic file placement for uploads. |
| LTeX+ | Extension | Provides English-language spell checking in Markdown documents. |
📥 Visual Studio Code Installation

🤖 Antigravity IDE Installation

- Download and Install Antigravity IDE
-
Install Foam for Gollum Extension
- ⚠️ The extension's custom file dropdown provider doesn't work in Antigravity IDE at the moment!
- Install LTeX+ Extension
⌨️ Custom Keyboard Shortcuts
Open the command palette with Ctrl+Shift+P and type Preferences: Open Keyboard Shortcuts (JSON) and select it with Enter. Add the following code to the opened keybindings.json file (remember to add commas wherever necessary):
 {
    "key": "ctrl+i",
    "command": "editor.action.insertSnippet",
    "when": "editorTextFocus && editorLangId == 'markdown'",
    "args": {
       "snippet": "*${1:$TM_SELECTED_TEXT}*"
    }
 },
 {
    "key": "ctrl+b",
    "command": "editor.action.insertSnippet",
    "when": "editorTextFocus && editorLangId == 'markdown'",
    "args": {
       "snippet": "**${1:$TM_SELECTED_TEXT}**"
    }
 }
Then, save the file.
It will add the following keyboard shortcuts to Markdown documents:
| Shortcut | Action |
|---|---|
| Ctrl+I | Italic |
| Ctrl+B | Bold |
🌐 Accessing the Repository

📥 Install Git
- Download Git.
- Install Git.
🖥️ Install GitHub Desktop (Optional)
You can also install GitHub Desktop for a GUI.
👯 Cloning the Repository
ℹ️ Note: Use these instructions if you have write rights to the GnollHack Wiki repository. They can be granted by Sound Mind Games admins.
- Open your terminal (e.g. PowerShell or bash).
- Go to the directory under which you want to clone GnollHack wiki, e.g. type
cd C:\repos. If the directory does not exist, you must create it. - Type
git clone https://github.com/hyvanmielenpelit/GnollHackWiki.gitand press Enter. - GnollHack wiki should now install to the
GnollHackWikisubdirectory.
🍴 Forking the Repository and Making a Pull Request
ℹ️ Note: Use these instructions if you don't have write rights to the GnollHack Wiki repository but you want to make a contribution.
- Go to the GnollHackWiki repository on GitHub.
- Fork the repository by clicking the Fork badge.

- Clone the forked repository to the local machine.
- Make changes and commit them.
- Push changes to the forked repository.
- Make a pull request to the GnollHack Wiki repository from the forked repository on GitHub.
You can read more about forking repositories and making pull requests in GitHub documentation: Creating a pull request from a fork.
📜 Editing Conventions
↨ Place Empty Line Around Headings
- Please use an empty line before all headings, except in the very beginning of a file.
- Please use an empty line after all headings.
💡 Example
# Heading1

Some text

## Heading2

Some text
📁 Use Subdirectories When Necessary
You should use subdirectories in the following cases:
- Logical grouping of a large number of files.
- ⚠️ There's a soft limit of 1000 files per directory on GitHub, after which directory listings are cut short.
- To prevent naming conflicts.
- For example, to differentiate between Grand Master monster and Grand Master difficulty.
⚠️ Warning: The
/gollum/folder is reserved for the Gollum wiki software functions. Please don't create that folder and don't put anything under it.
⚠️ Warning:
/.gollum/(note the dot.in the folder name) is reserved for website specific files that are not related to wiki pages. Please place all files that are related to the wiki website development under it. However, if you are only adding content to the wiki, you should not touch the files under/.gollum/.
⬆️ Uploads Should Go Under /uploads/
Uploads, such as images, should be placed under /uploads/. If the document with an upload is in a subdirectory, the subdirectory name should also be included in the path. This should be handled automatically by Visual Studio Code when you have the Foam for Gollum extension installed with the default settings.
💡 Examples
-
/uploads/Races/Dwarf/image.webp— An image inRaces/Dwarf. -
/uploads/Home/image.webp— An image inHome.
🖼️ Use Only WebP Files as Images
Please use WebP encoded at 85 quality as the image file format. Many image editing software support WebP.
- Adobe Photoshop has had native WebP support since February 2022.
- For earlier versions of Adobe Photoshop and Adobe Photoshop Elements, you can download WebPShop plugin.
💡 Tip: If your image has flat colors and is encoded in a lossless format, such as PNG, — which is usually the case with screenshots — you can re-encode your image to WebP at 100 quality to keep it lossless. However, this behavior needs to be implemented separately in your WebP conversion tool because the normal 100 quality encoding is not lossless. For example, the WebPShop plugin does this. A losslessly encoded image can be smaller than one encoded with 85 quality (lossy encoding) when the image has flat colors.
🔄 WebP Batch Conversion
You can use an online service to convert your images to WebP in one batch. Both of the services listed below use your web browser's client side logic to convert images to WebP, which means that no server is involved in the conversion process. The server only provides the web page and client side scripts.
1️⃣ Alternative 1: To WebP
To WebP supports almost all image formats, including JPG and PNG.
- Go to the To WebP website with your browser.
- First, before adding files, set Quality to 85 and Size to whatever scaling factor you want to use for your images.
- Click Add Files and select all files you want to convert.
- Click Download All to download all images in WebP format in a ZIP file.
2️⃣ Alternative 2: jpgtowebp.net
jpgtowebp.net supports almost all image formats, including JPG and PNG, but it supports converting only one image format to WebP per batch.
- Go to the jpgtowebp.net website with your browser.
- Select the appropriate converter (JPG or PNG to WebP) in the menu bar. (Less common image formats are behind the menu button.)
- Select your files.
- Click Show Advanced Options.
- Set Manual Quality Control to 85.
- If you want to resize your images, enable Resize Images and set Max Width (px) and Max Height (px) to limit the size of your images.
- Click Convert.
- Click Download All as ZIP.
🖼️ Illustrative Images
Follow these guidelines when creating or formatting images for the wiki:
| Property | Requirement | Notes |
|---|---|---|
| Square Image: Pixel Size | 512x512 pixels | |
| Horizontal Image: Pixel Size | 512 pixels wide | Height can vary. |
| Vertical Image: Pixel Size | 512 pixels high | Width can vary. |
| Rounded Corners | 12-pixel radius | ℹ️ Note: The wiki doesn't support the CSS border-radius property, so this must be done in an image editor.
|
| Background | Transparent | Do not use solid backgrounds like white. |
| File Size | < 100 KB | If the file goes over 100 KB, try reducing image quality to 80. |
🏷️ Page Title Can Be Customized Using H1 Heading (#) in First Line
Page titles can be customized using an H1 heading (single #) in the first line of a page.
💡 Example
# My Custom Page Title🔽 Use Only H2 (##) and Lower Headings
Since the H1 heading (#) is reserved for customizing page titles, please use only H2 (##) and lower headings as section headings in a page.
Wikilinks
Wikilinks link wiki pages to each other. They are page names in double brackets: [[Page Name]]. When a wikilink has an alias, it comes first, separated by a pipe from the page name: [[Alias|Page Name]]
ℹ️ Note: Global tag lookup is disabled, so you need to specify the exact path to the Markdown file in a wikilink.
ℹ️ Note: Even though browser URLs in the wiki have the .md extension, you don't need to use it in wikilinks.
ℹ️ Note: All wikilinks are relative to the current document directory and not to the root directory of the wiki (as in MediaWiki), making things a bit harder than necessary. However, you can just use
/at the start of wikilinks to make them relative to the root directory. We have adopted a convention to always use it before subdirectories, but you may need to use it when referring to a file in the root directory, when the current document is in a subdirectory.
ℹ️ Note: Wikilinks are case-insensitive, so you can write
[[/Items/potion of healing]], and it works like this: potion of healing — It links to Potion of healing.
⚠️ Warning: File names in the wiki Git repository are case-insensitive. Once you have committed a file to the wiki repository, you can't change its casing, which means you can't change the casing of a page title by editing a file name. If you have incorrectly cased a file name, it is recommended that you use an H1 heading (#) in the first line of the page to specify the right casing for the page title.
🛠️ How-To-Do Guide
| Action | Instructions |
|---|---|
| 👁️ Open Markdown Preview | Press Ctrl+Shift+V. |
| ➕ Create New Page | Hold Ctrl down while clicking a wikilink (e.g., [[New Page]]). |
| 🖼️ Add File or Image | Drag a file from File Explorer, hold Shift, and drop it into a Markdown document to automatically upload and tag it. |
| 📖 Add Word to Dictionary | Click the underlined word, click the yellow light bulb (quick fix), and select Add 'word' to dictionary. |
| 🚀 Publish Changes | Commit your changes in the Source Control view and sync them. (Updates take up to 5 minutes to appear online.) |
⚙️ Changing Image and File Dropdown Templates
Gollum supports three syntaxes for image and file links. When you drop a file or image into a Markdown document while having the custom file dropdown provider enabled, Visual Studio Code will create a template based on the chosen syntax. You can set your preferred syntax in:
- User settings: The settings will be global to all your repositories.
- Workspace settings: The settings will be specific to a repository.
Applying settings this way is useful when you have repositories using different syntaxes and conventions and your preferred settings vary across repositories.
🖼️ Image Templates
Based on the "foam.fileDropdown.imageTemplateFormat" setting, the custom file dropdown provider will generate the following templates.
| Syntax | Setting Value | Template |
|---|---|---|
| Markdown | "markdown" |
 |
| HTML | "html" |
<img src="/path/image.webp" alt="Text" width="Width" height="Height" /> |
| Gollum | "gollum" |
[[/path/image.webp|alt=Text, width=Width, height=Height]] |
The default setting is "markdown".
📄 File Templates
Based on the "foam.fileDropdown.fileTemplateFormat" setting, the custom file dropdown provider will generate the following templates.
| Syntax | Setting Value | Template |
|---|---|---|
| Markdown | "markdown" |
[Text](/path/file.pdf) |
| HTML | "html" |
<a href="/path/file.pdf"/>Text</a> |
| Gollum | "gollum" |
[[Text|/path/file.pdf]] |
The default setting is "markdown".